Kindle Wireless Setup
Setting Up Wi-Fi
- Press the Home button, then press the Menu
button.
- Use the 5-way controller to select
"Settings."
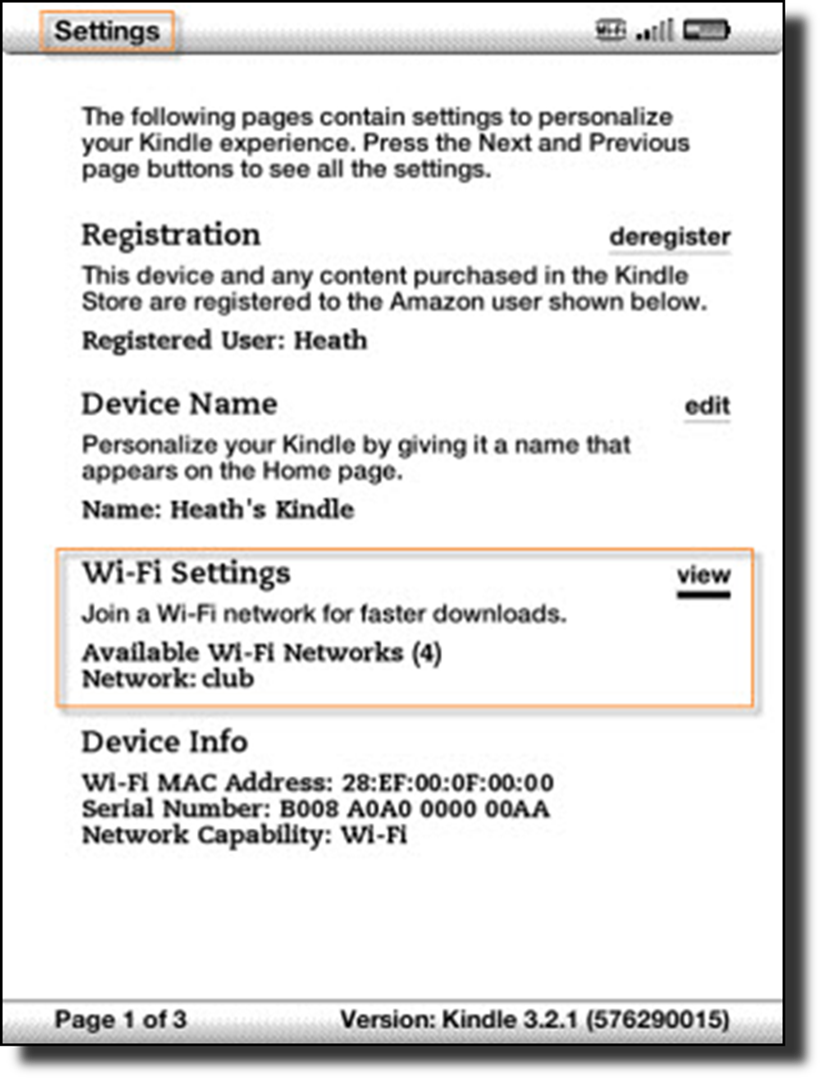
- Select "View" next to "Wi-Fi
Settings" to display a list of detected Wi-Fi networks. You may have
to wait a moment as your Kindle detects networks in range.
- Choose "connect" next to the Wi-Fi
network to which you want to connect. If necessary, enter the Wi-Fi network password. Press the Previous Page and Next Page buttons
to navigate to the symbol keyboard and uppercase letter menus to enter any
special characters or uppercase letters in your password.
Manually Adding a New Wi-Fi Network
- Press the Home
button, then press the Menu
button.
- Navigate to "Settings" by moving the
5-way controller down, then press the 5-way controller to select.
- Select "view" next to "Wi-Fi
Settings" to display a list of detected Wi-Fi networks. You may have
to wait a moment as your Kindle detects networks in range. Kindle
automatically scans for available Wi-Fi networks at periodic intervals. To
rescan for available networks at any time, select "rescan."
- Select "connect" to connect to a
network. If you see a lock symbol next to "connect," the network
requires a password to connect.
- If necessary, enter the Wi-Fi network password,
and choose "submit." Press the Symbol key to enter numbers or
characters not present on the Kindle keyboard.
Once you are
connected to a Wi-Fi network, Kindle automatically connects to it again
whenever that network is in range. If more than one previously used network is
in range, your Kindle automatically connects to the network that was most
recently used.
If your Kindle fails
to connect to the new Wi-Fi network, it will display an "unable to
connect" message. You can try manually entering all the network
information for the Wi-Fi network by choosing "set up network" when
you see the "unable to connect" message. If you don't know the
network information, try connecting to a different network, or contact the
network's administrator.

Remembering and Forgetting Wi-Fi Networks
After you have
successfully connected to a Wi-Fi network once, your Kindle will automatically
connect to it again when it detects a signal from that network.
You can tell Kindle
to forget a Wi-Fi network so that your Kindle doesn't connect to it
automatically in the future.
- While connected to the network that you want to
forget, press the Home button, then press the Menu button.
- Navigate to "Settings" by moving the
5-way controller down, then press the 5-way controller to select.
- Select "view" next to "Wi-Fi
Settings" to display a list of detected Wi-Fi networks. You may have
to wait a moment as your Kindle detects networks in range. The Wi-Fi
network you are currently connected to displays the word
"forget" next to it in the list of available networks.
- Choose "forget" to disconnect from the
network.
Kindle Fire Setup
Connecting with Wi-Fi
To connect to Wi-Fi
follow these simple steps:
- Tap the Quick Settings icon
 in the top right-hand corner of
the Home screen.
in the top right-hand corner of
the Home screen. - Select Wi-Fi.
- Ensure Wireless Networking switch is in the on
position.
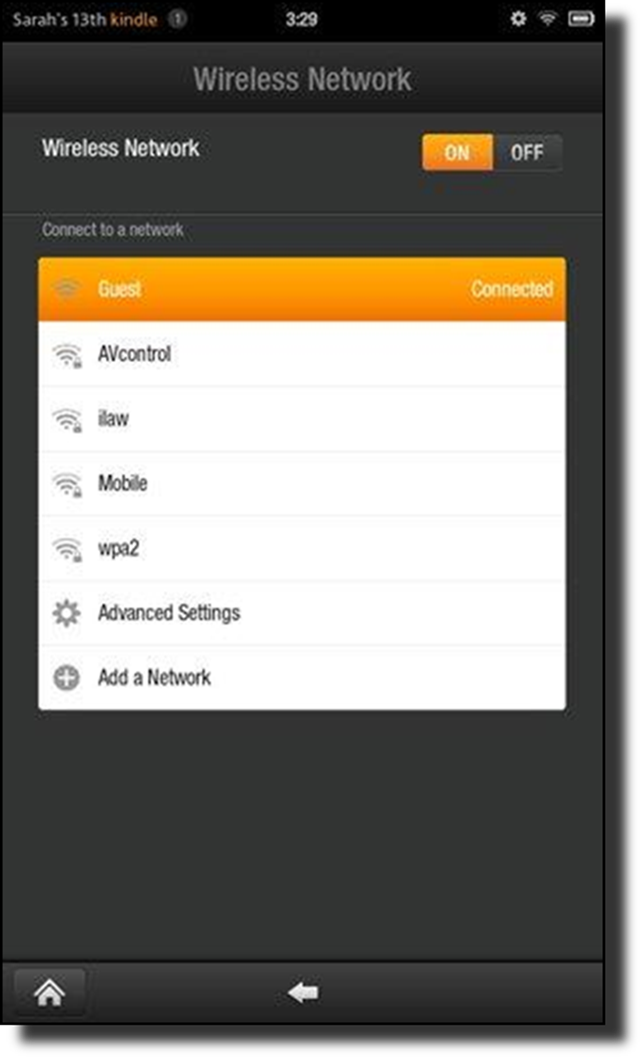
A list of networks
will appear. You may have to wait a moment as your Kindle detects networks in
range. If your network doesn't appear tap the box next to Wireless Networking
off and on to refresh the list.
- Tap the name of the network you wish to connect
to from the list of available networks.
Tip: When viewing Kindle Fire in landscape view, you may need to scroll through the list of available networks, using your finger to swipe through the list. - If a lock symbol appears next to your network, it
requires a password. Enter the characters of the password using the
onscreen keyboard.
- Tap Connect.
Tip: Tap the 123!? key
to enter numbers or symbols. Tap the ABC key to return to the regular keyboard.
Tap the Shift key (up arrow) for uppercase letters.
Manually Adding a New Wi-Fi Network
If you don't see the
network you want to connect to in the list of detected networks, you can add it
by selecting “Add a Network” at the bottom of the list of detected networks.
- Make sure you are within range of the network you
want to add, and that you know the network name and password (if
required).
- Tap the Quick Settings symbol in the top
right-hand corner of the Home screen.
- Select Wi-Fi from the menu.
- Ensure Wireless Networking switch is in the on
position.
- Scroll down to the end of the list of available detected
networks and select Add a Network.
- Use the onscreen keyboard to enter the name of
the Wi-Fi network that you want to add (Network SSID).
- Once the network name has been entered, tap the
Security box and select the type of encryption the network you wish to
connect to uses.
- If you select an encryption other than Open, tap
the Password box.
- Enter Wi-Fi password or network key using the
onscreen keyboard.
Tip: Tap the 123!? key
to enter numbers or symbols. Tap the ABC key to return to the regular keyboard.
Tap the Shift key (up arrow) for uppercase letters.
- Tap Save to store the details, then select
Connect to connect to the network.
Remembering and Forgetting Wi-Fi Networks
After you have
successfully connected to a Wi-Fi network once, your Kindle Fire will
automatically connect to it again when it detects a signal from that network.
You can tell Kindle
Fire to forget a Wi-Fi network so that your Kindle Fire doesn't connect to it
automatically in the future.
- Tap the Quick Settings symbol in the top right
hand corner of the Home screen.
- Select Wi-Fi from the menu.
- Ensure Wireless Networking switch is in the on
position.
A list of networks will appear. You may have to wait a moment as your Kindle detects networks in range. If your network doesn't appear tap the tick box next to Wireless Networking off and on to refresh the list. - Tap the name of the network you want to forget.
On the screen prompting you to enter a password, select Forget.
Tip: If viewing Kindle
Fire in landscape view, tap the remove keyboard button to return to the
password screen to select Forget.
Supported Wi-Fi
Networks
Kindle Fire support
multiple router types and Wi-Fi network encryption types.
Kindle Fire can
connect to Open, WEP, WPA PSK, WPA2 PSK, WPA EAP, and WPA2 EAP encrypted
networks. Kindle Fire can also connect to B, G & N type routers.
Kindle Fire can
connect to enterprise networks.
If your router has
MAC filtering enabled your Kindle's MAC address is added to your router's
whitelist in your network settings.
You may want to
contact your Internet service provider or router manufacturer for assistance
with troubleshooting your home network.
|
Router Restriction |
Compatibility
Requirements |
|
WEP Security |
Security Key
Passphrases are
not supported |
|
WPA Security |
Pass Key |
|
MAC Filtering |
Router must be
configured for Kindle Fire to connect. Please contact the person who set up
your router or the router manufacturer for assistance. |
|
Firewall |
Router must be
configured for Kindle Fire to connect. Please contact the person who set up
your router or the router manufacturer for assistance. |
|
Hidden Network |
You must manually
connect Kindle Fire in this mode. (Learn how to set up your Wi-Fi network manually.) |
Updated
Jul-20 by: Training@cableone.biz
To
submit feedback about this resource please submit a Training Ticket